Emu — the foundation model for Emu Edit and Emu Video

“Enhancing Image Generation Models Using Photogenic Needles in a Haystack” aka. Emu is a paper released by Meta to generate highly aesthetic images. It achieves this by introducing a fine-tuning technique called quality tuning which goes on to show that as little as two thousand high-quality images is all that is needed to achieve the objective and hence the paper title, “needles in a haystack”
In this article let’s look at the model architecture and the process to collate the quality dataset to train the Emu model and lastly, some of the mind-blowing results achieved by Emu.
Visual Explanation
If you are a visual learner like me, you might prefer watching the Emu model explained through a video here:
Approach
Emu is trained in two stages namely pre-training and quality fine-tuning. Though this may be a well-known recipe, the main message from this paper is that it all comes down to quality rather than quantity. So the authors have not only curated such a quality fine-tuning dataset but shown that such a fine-tuning does not compromise on the generality of the model as measured by the faithfulness metric.
Architecture
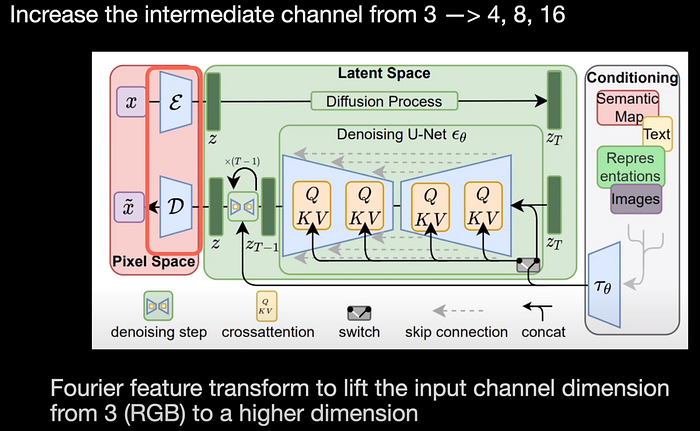
The first contribution of the paper is the modifications to the latent diffusion architecture. In that first comes the autoencoder which has the encoder and a decoder. The autoencoders typically use 4 channels in their intermediate layers thereby compressing the data and restricting their ability to represent fine details. In this work, the authors have increased the number of layers in the intermediate channels from 4 to 8 and 16. To increase the input channels further, they do a Fourier feature transform to lift the input channel dimension from 3 (RGB) to even higher dimensions.
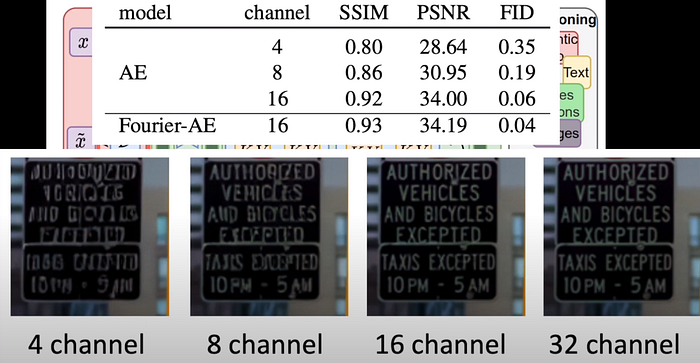
With these modifications, they tested the reconstruction of images and evaluated reconstruction scores such as FID and peak signal-to-noise ratio. We can notice that as the channels increase these metrics show an improvement. Even visually, the quality of images seems to get far better as the number of channels increases:
The next modification to the architecture is that of the U-Net used for denoising. To increase the capacity of the U-Net, they increase the channel size and the number of stacked residual blocks in each stage. And finally, they modify the decoder to output images at a high resolution of 1024 by 1024.
Pre-Training
With those architectural changes, they start with the first stage of training which is pre-training. Pretraining needs a massive dataset and so they pre-train with 1.1 billion images. But the point to note here is that they employ progressive training by gradually increasing the resolution of the image. This seems to help the model learn fine details in the images slowly but steadily.
The other thing is the introduction of noise offset in the final stages of pre-training. It was introduced in this blog which states that by simply modifying the noise with a small offset, enables Stable Diffusion to generate very dark or light images easily.

The offset can be introduced with 1 line of code modification in PyTorch where we add a small offset of 0.1 or similar to the noise generation process.
Fine-tuning
The second stage of the training is Fine-tuning. The pre-trained model obtained in the first stage is now subject to quality-tuning. But for this, we need the quality dataset in the first place. So how do we curate such a quality dataset for quality tuning?
For this, the authors of the paper employ a two stage filtering process namely automatic filtering and manual filtering.
In automatic filtering, they use algorithms to remove images that have too many texts using OCR recognition algorithm. They also employ CLIP to keep only results with good image-text alignment. Lastly, they also remove images with bad aspect ratio and image size and end up with a dataset of 200 thousand images which is a lot less than the billions we started with.
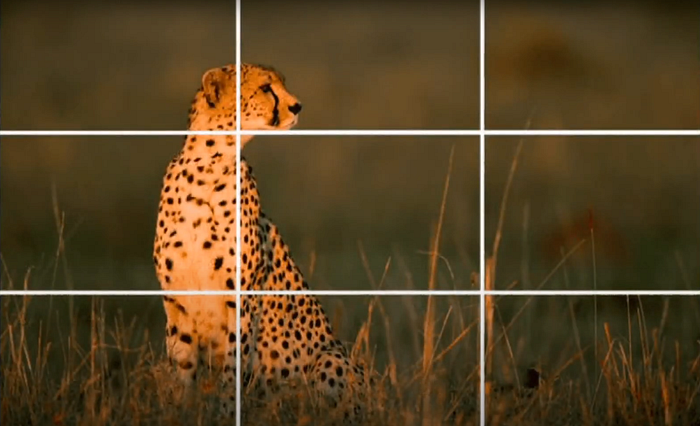
In the next step of manual or human filtering humans manually assess the images for aesthetic appeal. For example, this image satisfies the rule of thirds in photography and so it is aesthetically appealing.
Similarly, portraits taken using professional photography gear are quite appealing compared to ordinary images because the background is all blurred creating what is called a bokeh in photography. So it’s much more aesthetically appealing compared to a selfie taken on say a mobile phone.
The human filtering step resulted in just two thousand images. They then composed captions to those images. The image-caption pairs were then used for training the Emo model.
Because there are just 2k samples, they fine-tuned for just 15K iterations with early stopping. The results are incredible as seen in the next section.
Metrics
For evaluation, they were mainly concerned about the two metrics — visual appeal and faithfulness. They ditch the FID scores as many recent papers argue that FID scores do not correlate well with human assessment of the performance of generative models.
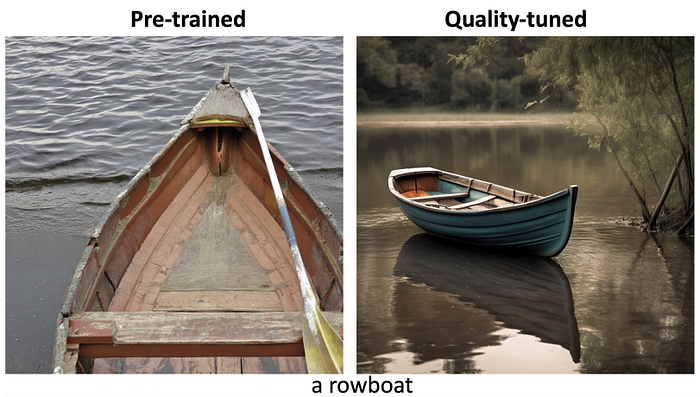
Visual appeal is subjective and so the generated images were shown to 5 annotators, usually with generated images from two models shown side by side and the annotators chose which one of the two is more appealing. For example, if we are comparing the pre-trained model with the quality-tuned model (as shown in the figure above), then these two images are shown to the annotators who are asked to choose which one of the two images is visually appealing. I would personally choose the quality-tuned one straightaway.

Text faithfulness refers to the degree of similarity between a generated image and a text caption. Again, the annotators were asked to ignore the visual appeal of the images and asked to choose which ones best describe the caption with choices “A ”, “B”, and “Both”. For example, the above image is for the caption, “A teddy bear working on AI research”, which is more faithful compared to “A teddy bear playing with a computer”.
Results
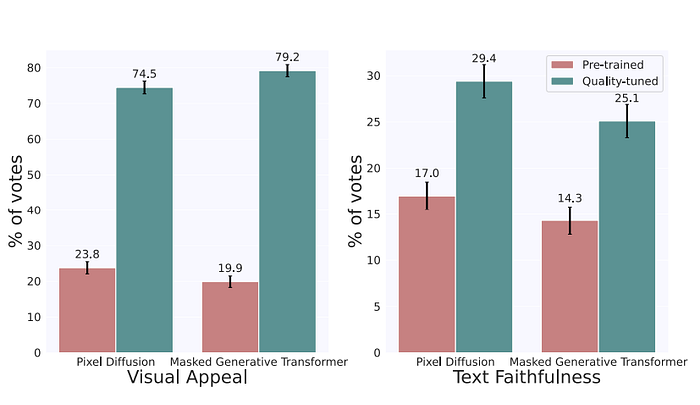
Lastly, the paper shows that quality tuning is not just restricted to the latent diffusion models but applicable to other models like pixel diffusion and masked generative transformers. As seen from the figure above, quality tuning when applied to these models also improves the visual aesthetics of the model.
Conclusion
In my opinion, this paper is a clear eye-opener to show how small the fine-tuning dataset can be to tune LLMs or VLMs. That too, to achieve results that are so good that we can use them in production applications.
There are a couple of extensions of this paper namely Emu Edit and Emu Video. I will be reviewing them in the upcoming posts. Until then, I am signing off and I will see you in my next… till then, take care!